Quick remapper update:
- Finally fixed unbounded execution
- N-way mirroring (for values of N in (1, 2, 4))
Starting to produce nicer maps! But still a few pain points that must be solved first.
Unbounded execution
Originally the code had the bad behaviour that looked more or less like this:
room_count = 0
while True:
    if room_count > wanted_rooms:
        break

    pos = random_position()
    room = random_room()

    if room.can_place_at(pos):
        room.place_at(pos)
        room_count += 1
This has now bee replaced with something that results in bounded execution which should be a huge improvement for user-friendliness. The new code looks like
room_count = 0
while True:
    if room_count > wanted_rooms:
        break

    if available_positions() == 0:
        break

    pos = random_position()

    for room in random_room_possibilities():
        if room.can_place_at(pos):
            room.place_at(pos)
            room_count += 1
            break
    else:
        remove_position(pos)
Or, as a diff:
     if room_count > wanted_rooms:
         break

+    if available_positions() == 0:
+        break
+
     pos = random_position()
-    room = random_room()
+    rooms = random_room_possibilities()

-    if room.can_place_at(pos):
-        room.place_at(pos)
-        room_count += 1
+    for room in rooms:
+        if room.can_place_at(pos):
+            room.place_at(pos)
+            room_count += 1
+            break
+    else:
+        remove_position(pos)
Now the code generates the complete set of possibilities and will test them sequentially. If it fails to place anything, it removes the position from the set.
N-way mirroring
Originally room placement code was done in the CLI scripts. This was moved into
UPM which can now place 1, 2, or 4 copies of the room as desired.
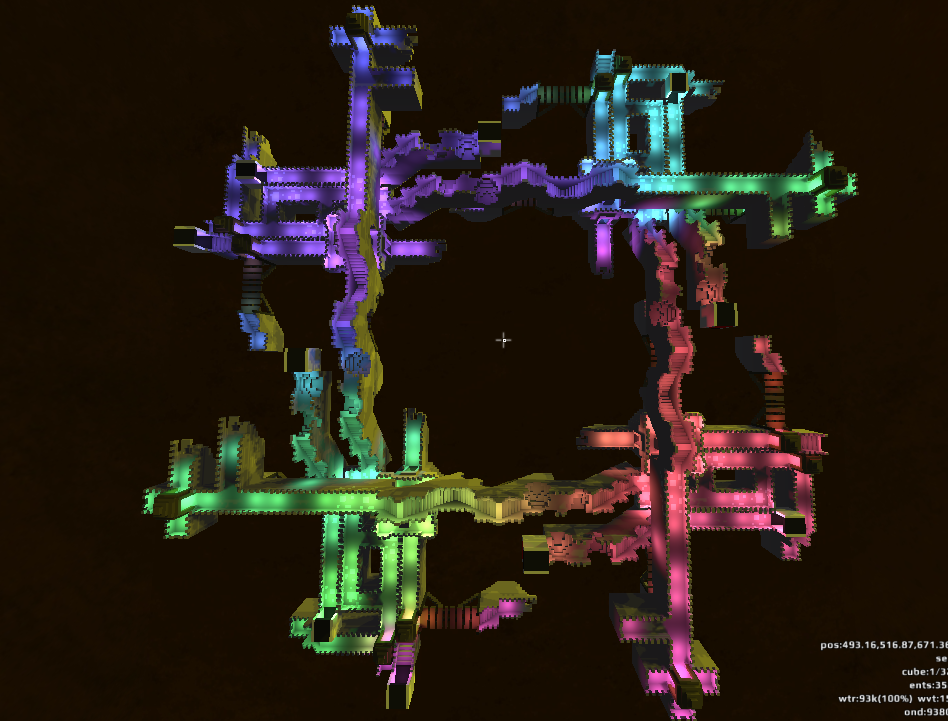
This looks very, very like a CTF map. I should probably implement some facilities for this eventually. Given how well this turned out, it could work quite well for those game modes. We’d want to ensure that the number of routes was sufficiently high, but this is a planned feature anyway.
Current Issues
-
Not enough circuits, there are some places you have to jump because they’re sortof dead ends.
So far I’ve been using dumb luck to get good maps. There are currently two phases:
- extend walkways from initial seed
- add “endcaps” (completely dead ends that prevent you from walking off into space.
I’m planning to make it three phases:
- extend walkways from initial seed
- attempt to connect nearby doorways
- add endcaps to remaining doors.
That should help increase the number of possible circuits (speaking in graph terms) which would be a huge improvement. Not sure how to do this, it is easy in the simple case (two doorways facing each other, separated by 1 or 3 spaces) but there are more complex cases that are most certainly not trivial to handle (two doorways not facing each other, or two doorways facing each other which are vertically / horizontally offset)
Surely there are better ways to generate networks between nodes that are highly connected but conform to the rules provided by the available tile sets?
-
There’s a place (in Mannheim) where you come down the stairs and it’s a relatively flat area but there are low walls that you can’t walk over and you have to awkwardly go around.
I’m thinking about the ways to “erase” walls when there are two walls next to each other that do nothing useful. Not sure how to implement this yet. Same with the
randOptsof the “old” pieces, how to handle N variations of a part without requiring building N completely different models.
Adding New Parts
Since I never documented this anywhere else… adding new “tiles” to the tilesets is pretty easy. As of the commit mentioned at the top of the page, you can do the following:
Setup
- Obtain goxel
-
Some commands:
 git clone https://github.com/hexylena/remapper/
 cd remapper
 git checkout 03d366b32bd1344c83d684a9c2f3baa860c27a67
 git checkout -b my-new-rooms
Adding Your Model
- Choose a name for your work. It should be compatible with python package
names (so
[A-Za-z_][A-Za-z0-9_], (alphanumeric starting with alpha.)) We’ll usecastlefor the remainder of this example. - Make a directory in
redeclipse/prefabs/<your chosen name>/, e.g.redeclipse/prefabs/castle/ -
Build a room in goxel. Try to stick to 8x8x8 cubes, and to fill them up completely on the
xandyaxes. (This is a strange restriction, but I haven’t nailed down a good way to handle this otherwise, unfortunately.)This means that if you want to design a small platform, make sure that the base is at least 8x8, it doesn’t matter how tall it is.
You can place voxels in as many 8x8x8 cubes as you need. E.g.
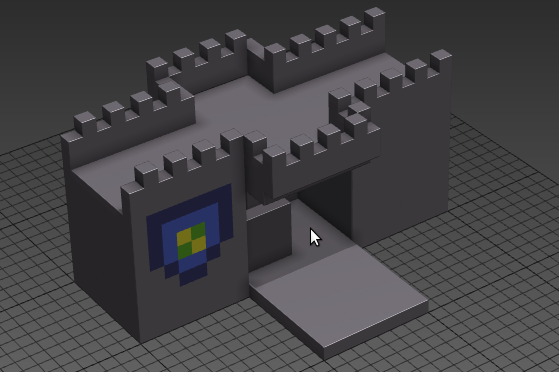
Note here that the bottom 8x8x8 cube on the near side is completely “filled” to the extent of the cube that would be considered occupied. (I know this is a terrible explanation, sorry. Just try and fill out to the edges of 8x8x8 cubes at the ±x/y faces.)
Save your room to
redeclipse/prefabs/<your chosen name>/<your model name>.gox, e.g.redeclipse/prefabs/castle/castle_wall.gox. -
Edit the
Makefilein the root of the project. You’ll need to add your directory to the end of the definition ofGOX_FILESCurrently it looks like the following (with only the first entry shown, there are more but it makes the example obnoxiously long):
GOX_FILES := $(wildcard redeclipse/prefabs/original/*.gox)You’ll need to add your folder to the end of this list, e.g.
GOX_FILES := $(wildcard redeclipse/prefabs/original/*.gox) $(wildcard redeclipse/prefabs/<your folder name>/*.gox) - Now you can must run
make vox_fileswhenever your.goxfiles change. It doesn’t hurt to run it if they haven’t, the makefile is configured to only convert the models if needed.
Writing the Python Code
First, create an __init__.py in that folder, e.g.
redeclipse/prefabs/castle/__init__.py
You’ll probably want to import the following by default:
   import os

   from redeclipse.prefabs.magica import MagicaRoom
   from redeclipse.vector.orientations import EAST, SOUTH, ABOVE, WEST, NORTH
   from redeclipse.prefabs import LIGHTMAN
For each .gox model that you’ve built, you’ll want to define a python class
for this, representing the model.
We’ll go through the following example from one of the castle pieces:
class castle_gate(MagicaRoom):
    name = 'castle_gate'
    vox_file = os.path.abspath(__file__).replace('__init__.py', 'castle_gate.vox')
    room_type = 'setpiece_medium'

    doors = [
        {'orientation': WEST, 'offset': WEST + NORTH + ABOVE},
        {'orientation': EAST, 'offset': EAST + EAST + EAST + NORTH + ABOVE},
        {'orientation': NORTH, 'offset': EAST + NORTH + NORTH + NORTH},
        {'orientation': SOUTH, 'offset': EAST + SOUTH},
    ]
We’ve given the class an abritrary name, castle_gate. For simplicity
we’ve used the same name as we gave the .gox file (and thus also the
automatically built .vox file)
This class has a name = attribute which is set to the same thing. This
is really super redundant and will probably be removed in the future.
Next, it specifies a vox_file = os.path... attribute which is also
somewhat redundant and will probably be removed in the future. For now,
just copy that and replace castle_gate with whatever you named your
class.
Lastly, we define a list of doors, each of which consists of a dictionary
containing orientation and offset.
The orientation specifies which way the door faces, and this, by
definition, should be away from the model. Note that the door with the
orientation west is offset to the west + north + above. This should
make sense, the door to the west of the model faces west, to the east of
the model faces east.
If you aren’t sure which way your model faces, you can run the helper script
python redeclipse/cli/magicavoxel_info.py redeclipse/prefabs/<your chosen name>/<your model name>.vox
# e.g.
python redeclipse/cli/magicavoxel_info.py redeclipse/prefabs/original/spawn_room.vox
(Note the .vox extension.) This will print out “slices” of the model from bottom to top, like an MRI.
==== z = 0 ====
0-xxxxxxxx+
-
y ########
y ########
y ########
y ########
y ########
y ########
y ########
y ########
+
==== z = 1 ====
0-xxxxxxxx+
-
y ########
y #      #
y #      #
y #      #
y #      #
y #      #
y #      #
y #      #
+
Here we can see a door to the +y direction as evidenced by the border on
the ±x and -y sides of the box. Use the following table for converting to
an orientation:
| Direction | Orientation |
|---|---|
| +y | EAST |
| -x | SOUTH |
| -y | WEST |
| +x | NORTH |
Lighting
You may need to add extra lights. They’re added relative to the smalled x / smallest y 8x8x8 cube in your model.
def render_extra(self, world, xmap):
    LIGHTMAN.light(xmap, self.pos + ABOVE)
By default the LIGHTMAN lights the block in the center of the 8x8x8 cube. If
you don’t define this function on your class, it will do just that which may or
may not be right. In the above example we add ABOVE to the position to move
it one cube above since many of the castle tile set include a solid cube below
them (as part of the “castle wall” effect.)
However, if you need to offset that light to another 8x8x8 cube, you’ll need to do something more complex:
LIGHTMAN.light(xmap, self.pos + (EAST + EAST + ABOVE).rotate(self.orientation))
This places the light two positions to the EAST (+y) and one 8x8x8 unit
above. Any positional offsets must be grouped in parentheses and a
.rotate(self.orientation) applied at the end.
Checking the Output
- Open up
redeclipse/cli/magicavoxel_room_test.pyin your editor. - Add your folder name to this line
- Include your class name in
magica_classes. If you named your foldercastleand your modelcastle_gate, then you’d addcastle.castle_gate,to themagica_classesvariable. - Run
python redeclipse/cli/magicavoxel_room_test.py --magicawhich will produce a set of.voxfiles for each and every model inmagica_classes. -
Open this in
goxel, it should look something like: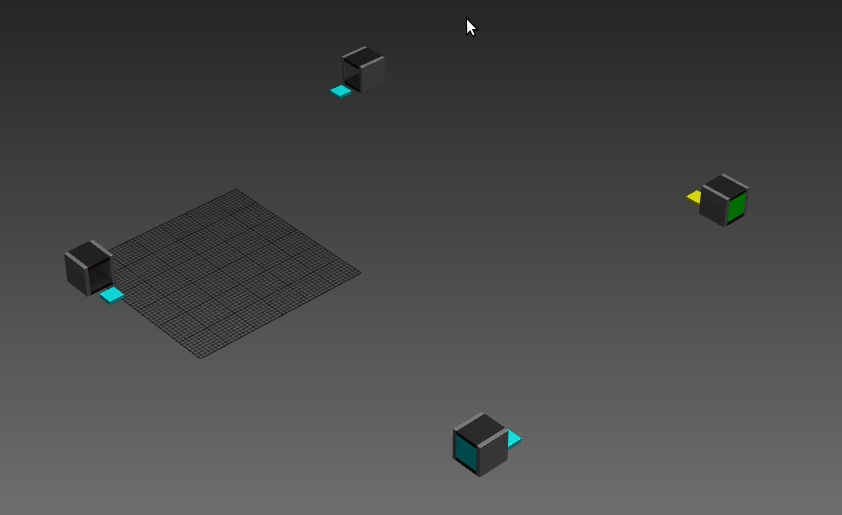
Note the small 4x4 blocks in “front” of each of the doorways. This lets you test that you’ve got the doorways correctly defined. The room is output in every rotation as a further test that everything is working properly.
- If everything looks good, you’re ready to add it into the main room
generation script.
You’ll want to edit
redeclipse/cli/magica_rooms.py, add your project name to the import list on line 15, and then add yourproject.model_names to thepossible_roomsarray (same asmagica_classes) -
Run it!
python redeclipse/cli/magica_rooms.py maps/empty-day.mpz \ --seed 42 --rooms 200 \ --mpz_out ~/.redeclipse/maps/test.mpz - Launch redeclipse and open the map.
<backtick>/map test<enter>